One of my favorite Christmas Traditions

Friday, November 16, 2018

This post is in partnership with Minted.  Thank you for supporting the brands that make this blog possible! 

Isn't Christmastime the best?!  I just love the lights, the spirit, the magic and community that comes with Christmastime.  Last year, as you can imagine, was a rather crazy Christmas season as we were figuring out twins and toddler with new 'big brother' status.  We had a fabulous holiday(snowfall included!), but the one thing we didn't get to was sending out Christmas cards, and I was so sad that we didn't make that happen.  

A few days ago, I was looking through some family photos and found our Christmas cards from the past three years (last year was missing, of course).  I love having a record of how our family has changed from year to year.  And I really love being able to send them out to friends and family each year. 

One of the most challenging parts of ordering and sending out Christmas cards is choosing a design.  This year, I am partnering with Minted to make some gorgeous cards, and they have SO many amazing designs!  I mean, how do you even choose one? I think I had 20 tabs open at one point. 

Minted also has so many customizable options that I am a big fan of.  I am thrilled that they let you do text on the back (I am planning on doing a little family update on the back of ours), they have lots of paper choices including 100% recycled (super exciting for my inner environmentalist).  They will print the addresses you are sending cards to for free, which is such a time saver.  And, the designs are from independent artists, which I think is amazing.  Seriously, they are doing great things with Christmas cards.  I cannot wait to order ours! Getting ours in the mail is always a highlight of my Christmas season.

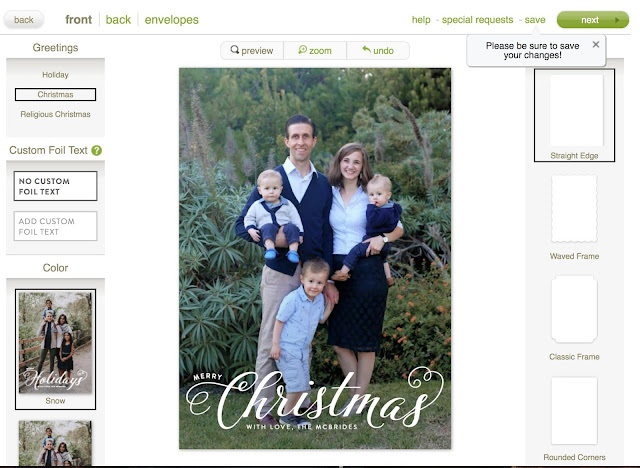
Now, leave a comment telling me which of the two following designs you like best for our card!  I always struggle to decide what to do.  I might have a winner, but want to see what you think, too!  And while you are at at it, check out Minted's amazing selection of Holiday cards! 

Option 1 (Blessed Christmas):  

Things I love: 
- The font.  I think it is classy and fits well with the photo.  
- I love that the photo takes up the entire card, but there is still some sort of holiday greeting from our family. 
- Those three little boys 

Things I am not sure about: 
- Do I want a text overlay?  Does it look too basic, when there are so many other options? 


Option 2 (Understated Pines):

Things I love:
- The leaves. It isn't a super Christmasy photo, so I thought the leaf watercolor on the card was a nice accent.  
- I love how simple the card is, but that it isn't plain (I will be adding all our names to the card at the bottom by 2018.  I just didn't do that here for privacy reasons).  

Things I am not sure about:
- Is it too simple for the photo?  Is the photo too small?  


Option 3 (Bountiful): 

Things I love: 
- The pretty watercolor! 
- the framing of our family photo. 

Things I am not sure about: 
- The text... I kind of wish it only said Merry Christmas, but you can't adjust that, from what I have been able to tell.  
- Is it too busy?  With all the foliage behind us, I worry it is too busy.  


***Minted also has a special running on their website for 15% off with the code MERRY and free shipping on orders over $100 with code FS100.  It runs until 11/20/18.  

Butternut Squash and Fontina Soup

Wednesday, November 7, 2018

I had a few reasons to be excited about moving into a house last summer (no downstairs neighbors, no climbing a flight of stairs with groceries, a garage to park in, four seasons...) but one of the things I was looking forward to the most was the garden.  

My mother-in-law has a remarkably green thumb and can grow almost anything.  In the spring, dozens and dozens of tulips and daffodils come up out of nowhere, and there are waves of flowers that come throughout spring and summer in different parts of the garden.  Then she has garden boxes for planting vegetables.  

In the past, Adam told me there was an enormous garden plot in the backyard and they used to grow most of their summer vegetables there, but since only two people have been living here for many years, it shrunk down, and is now fairly small, but there was still room for me to plant tomatoes, potatoes, carrots, peas, squash, some greens, pumpkins and a few other things.  It was a delight to wander around the garden on warm summer evenings, looking to see what was ready for picking.  

I really was looking forward to getting a few butternut squash out of the garden, because it is my favorite winter squash, but sadly, one of the vines ended up producing pumpkins (my fault or the seed packet? We will never know), and the actual butternut squash vine only produced one small squash.  I had envisioned squash soup through all of fall, and was a little disappointed at the lackluster turnout.  Thankfully, kind friends and neighbors came to the rescue and we ended up with a few butternut squash.  

I had never found a butternut squash soup recipe that I loved (although I had eaten some delicious ones, so I knew it was possible), so I was thrilled when I threw a few random fridge leftovers in with the butternut squash and made a creamy, rich and thoroughly delicious soup.

This is very likely to become the staple butternut squash soup in our home.  It was so good.  I hope it helps fulfill your fall squash dreams, too.  

Happy Cooking!  


Butternut Squash and Fontina Soup

1 large Butternut Squash, roasted
1 onion, diced
1 Tbs olive oil
6 - 8 fresh sage leaves, chopped into small pieces (or 1 tsp dried sage leaves)
1 cup shredded fontina cheese
1 cup cream
1 tsp salt
2 cups veggie broth

To roast the squash: 
Preheat oven to 400°F Chop the squash in half vertically from the stem to the bottom.  Scoop out the seeds in each half and discard them.  Pour a small amount of oil on a rimmed baking sheet, lined with a silicone baking mat or foil.  Place squash fleshy inside down on the sheet and bake for 40-50 minutes until it is very easily pierced with a fork.  Remove baking sheet from the oven and let squash cool.  Then use large spoon and scoop out the flesh and discard the skin.  

To make the soup:
Sauté onions in the oil for 5-7 minutes, until they are translucent and soft. Add sage and squash and cook for another 1-2 minutes.  
Add the broth and salt and stir.  
Cover and bring mixture to a boil. Turn down the heat and let the soup simmer for 8-10 minutes 
Remove soup from the heat, and put it in a high speed blender.  Blend up until it is very smooth and then put back on the heat, add the cream and the shredded cheese and then heat until the cheese is melted.  

Enjoy!


5-Minute Artisan Bread

Monday, May 21, 2018

A few months ago, I happened upon a book called "The Kitchen Counter Cooking School."  It was a truly terrific book, and inspiring in a lot of ways.  The basic premise is that the author (a graduate of Cordon Bleu in France), decides to hold a free series of workshops for people who can't cook, and help them learn the basics in order to improve their eating lives.  

They all happen to be women (she had a man involved initially, but he dropped out before it started),  of all different ages, and many backgrounds, and then she and a few other chef and culinary friends teach them all sorts of skills from chopping vegetables, to making bread, to not wasting as much food in the kitchen.  

One of the recipes that she includes is this 5-minute artisan bread recipe.  Perhaps you have heard of it before (I had), but I felt like it would be a good fit for my current life.  So I tried it out!  It isn't the best loaf of bread I have ever made (that would be the super buttery brioche that I made for Christmas Morning...), but it was very tasty, and SO fast and easy.  Even I can squeeze in 5 minutes to throw together this loaf.  

It makes a smallish loaf (Actually 4 smallish loaves, total), but it is perfect for our little family to eat with a soup for dinner.  Sometimes there are leftovers, and sometimes their aren't.  Either way, it is a great way to get a homemade bread out in record time.  


Super Easy Artisan Bread
From The Kitchen Counter Cooking School & Artisan Bread in Five

3 cups lukewarm water
1 Tbs yeast
1 Tbs Salt
6 1/2 cups all-purpose flour (you can substitute up to 1/2 of the flour with whole wheat flour)

In a large bowl, or container with a lid, combine the water, yeast salt and flour, and mix with a spoon until the flour is incorporated (it will be a wet dough, and quite lumpy). Cover lightly, but do not seal, if you are using a lidded container.  Put in the refrigerator overnight (you can also use after two hours.  See this article for directions on how to do that). 

The next day, lightly flour the top of the dough in the container, and pull out 1/4 of the dough.  

Form it into a ball, and place on a cornmeal sprinkled silicone mat or parchment paper.  Let the dough sit for 40-90 minutes.  The dough will not rise a lot during this time, and that is okay.  

Preheat your oven with a baking stone in it, to 450°F and place a heat-proof pan (like a cast iron or metal pan) on a rack below the stone.  

Slash the top of your bread with a very sharp knife.  

Carefully slide the loaf onto the hot baking stone and pour a cup of water into the heat proof pan below.  Quickly and carefully close the oven door, and let it cook for 30-35 minutes until golden brown, and hollow sounding when you tap it.  

Remove and let cool until it reaches room temperature, then serve.  


Zucchini, Beet, Apple Bread

Wednesday, May 16, 2018


The older I get, the less I am liking sugar.  My dad has never really liked sugar, in my lifetime (although apparently he did used to eat a Three Musketeers bar everyday in his lunch in high school), and I never understood that.  But these days, the less I eat sugar, the better I feel, and the less I like it.

In all honestly, I just really don't like the way eating a lot of sugar makes me feel.  I typically end up feeling foggy, headachy, or sick, so we have been cutting out a lot of sugar in our diets.  Also, there have been a lot of studies lately that show how terrible eating sugar is for our bodies.  We just don't need it and it is causing all kinds of issues with our bodies.  

This bread is a wonderful way to have something slightly sweet and tasty feeling without getting the sugar rush.  Plus it is a great way of incorporating more vegetables and fruit into your diet!  


Chocolate, Beet, Zucchini Bread
Adapted from Kitchen Matters
1 loaf

1/4 cup coconut oil, melted
1/4 cup sour cream
1/2 cup maple syrup
2 eggs
1 tsp vanilla extract
1 1/2 cups whole wheat flour
1/4 cup cocoa powder
1 tsp baking soda
1/2 tsp baking powder
1/2 tsp sea salt
1 1/2 tsp cinnamon
pinch of nutmeg
3/4 cup shredded, unpeeled zucchini
3/4 cup shredded, unpeeled apple
3/4 cup shredded, peeled beet

Preheat your oven to 350°F.

Grease a standard sized bread loaf tin.

In a medium bowl, mix the oil, yogurt, syrup eggs and vanilla until combined. In a large bowl, mix flour, cocoa powder, baking soda, baking powder, salt, cinnamon and nutmeg together.

Stir the wet ingredients into the dry ones.  Fold in the zucchini, beet and apple and pour it into the pan.

Bake for 50-60 minutes until a toothpick comes out lean.

Let cool for 5-10 minutes, then let it cool.  Eat within 3-4 days.


SaveSave

Life-Saving Items for the first 3 Months of Twins

Monday, May 14, 2018


Let's face it, having twins is just hard.  It is also completely wonderful and amazing, but there are a bunch of things that make it pretty difficult (two babies, not sleeping, trying to nurse in tandem, or bottle feed two... you get the picture).  So, today I wanted to share a few items that made having twins a little easier for me.

Twins are more common than they used to be (I read a statistic somewhere that said 1 in 30 children born is a twin now!), so maybe you are having twins, or you know someone who is having twins.  Here are a few items that made a big difference those first three months!


Life-Saving Baby Items for the first 3 months of Twins

Rock 'n Play - We had borrowed one from a friend, but only having one was super inconvenient, so my kind mom bought us a second one.  We still use them almost every day(babies are almost 6 months), and used them constantly for the first 3 months.  We haven't ever used the vibrate feature (I have heard that can make babies dependent on it, and I certainly didn't need that), but it can vibrate, and I think some of the fancier models can play music, too.
Munchkin Pad - This is silly, but these were amazing.  A friend gave us a beautiful crocheted Moses basket, and these were the liners, but I ended up using them long after the babies grew out of the Moses basket.  We had a number of episodes where I would set one of the babies on the couch for just a minute while I was getting ready to nurse them or something (I couldn't hold them both at the same time very well at the beginning) and very often, they would spit up, or leak through their diaper at that exact moment!  So inconvenient!  These are small, portable, waterproof and washable, so they were terrific for taking around the house and using to change diapers or just set the baby on, if you are worried about the couch or carpet (which I am, because both belong to my in-laws).
Tubby Todd's all over ointment ($10 off your first order through that link) - We LOVE Tubby Todd, and my babies have truly terrible skin.  They have eczema, they peeled like crazy (pretty much every doctor we saw during their most peely stage was shocked at how much they were peeling), and are dry and red most of the time.  This ointment hasn't solved the problem (it is doubtful that much could, honestly), but has helped keep a lot of the redness and chapping under control.
Baby Car Seat Cover - These are the best.  We went to the hospital at 2 1/2 months, when the babies got RSV, and I was so grateful to have them over each car seat when we were sitting in the waiting room with tons of other sick, coughing people.  They are also so good for nursing, can double as a blanket, if needed, and are light, but not sheer.  They are amazing.
NoseFrida the Snotsucker - Another necessity if you have a wintertime baby.  When the babies got RSV, their case was mild enough that they didn't need oxygen, but they did need to be suctioned out regularly, to help keep them comfortable.  It was amazing to be able to do it at home (not quite as effective, but still fabulous), and to know I could clean the whole thing out.  Those bulb syringes, while wonderful, can be really disgusting after a good cold.
Baby Socks - One of the unexpected things about twins, is that not only do they scratch themselves as infants, they also scratch each other.  We still have them wear socks on their hands regularly to protect them from each other.  My favorite pairs that we have were a gift from some of Adam's professors from Austin, and they are by SmartWool.  They are warm, stretch, are machine washable and stay on so well.
Cloth Diapers Burp Rags -  One of our neighbors gave us a huge stack of these (she had twins about 30 years ago, and they were still sitting in her garage), and they have been my favorite.  I love how absorbent they are, and that they are a super neutral color, and that they are all the same color (the minimalist in me, maybe?).  They are better than any other burp rag we own, and I am so glad I have about 15 of them, because they get used all the time.


SaveSave
Measure & Whisk: Real food cooking with a dash of minimalist living © . Harlie Ave Design .